TIP
# This article: Deploying Thinkphp5 project locally on Windows using Docker+nginx+MySQL
Docker is an open-source containerization platform that can package applications and their dependencies into a portable container and run in different environments. A container is an independent, portable, and replicable software unit that contains applications, runtime environments, system tools, and libraries. Docker utilizes the lightweight and fast startup features of containers to provide a more efficient and convenient way of software development and deployment.
By using Docker, developers can package applications and their dependencies into a Docker image, deploy the image to any environment that supports Docker, and ensure that the application runs consistently in different environments. Docker images can specify the required operating system, libraries, and other dependencies when deploying thinkphp5 using Docker+nginx+MySQL to build windows locally, ensuring that the application has the correct environment at runtime.
Docker also provides a set of command-line tools and APIs for easy management and operation of Docker containers. Using Docker, developers can quickly create, start, stop, and destroy containers without worrying about the details of the underlying operating system.
Docker also supports container orchestration and cluster management functions, which can organize multiple containers into one service and manage their lifecycle and resource allocation. Docker Swarm is Docker's native cluster management tool that can automate the deployment and management of containers on multiple hosts.
In short, Docker is a powerful containerization platform that provides a more efficient and convenient way of software development and deployment through the lightweight and portable features of containers. It has been widely applied in various scenarios, including application development, testing, delivery, and deployment.
# Step 1: Download Docker Desktop
docker Desktop 下载 (opens new window)
# Step 2: Prepare the required image
docker pull nginx:*

docker pull php:*-fpm

docker pull mysql:*
2
3
4
5
- Please choose the version information representing each image, for example Docker pull PHP: 7.4 fpm。
Note: Please ensure that each image is successfully pulled!!!
# Step 3: Create a network
Description: Create a network to facilitate communication between containers.
docker create network my-network
My network: Customize the bridge network name.
# Step 4: Start the container and run it
First, rundocker run -d --name nginx-container -p 8080:80 nginx:*,After successful operation, use the following command to copy the contents of nginx to the corresponding local directory:
1、docker cp nginx-container:/usr/share/nginx/html D:/docker/www(Copy access page pointing to D:/Docker/www)
2、docker cp nginx-container:/var/log/nginx D:/docker/nginx/logs(Copy nginx's logs to D:/Docker/nginx/logs)
3、docker cp nginx-container:/etc/nginx/conf.d D:/docker/nginx/conf(Copy the default.conf configuration file of nginx to D:/docker/nginx/conf)
After handling all the above, delete the nginx container and delete it in Docker Desktop or use the command
docker stop nginx-container &&docker rm -f nginx-container
Then run the following commands in sequence:
docker run -d --name  phpfpm -p 9000:9000  -v  D:/docker/www:/www --network my-network php:7.4-fpm

docker run -d --name mysql-container -p 33060:3306 -e MYSQL_PASSWORD=123456 -e TZ=Asia/Shanghai --network my-network mysql:*

docker run -d --name nginx-container -p 8080:80 -v D:/docker/nginx/logs:/var/log/nginx -v D:/docker/nginx/conf:/etc/nginx/conf.d -v D:/docker/www:/usr/share/nginx/html --network my-network nginx:*
2
3
4
5
6
7
Note: Mapped ports: The former refers to the host port, while the latter refers to the container port* Indicate the version number of each container and replace it with the image version number you downloaded.
# Step 5: Configure tp5 to hide index.php
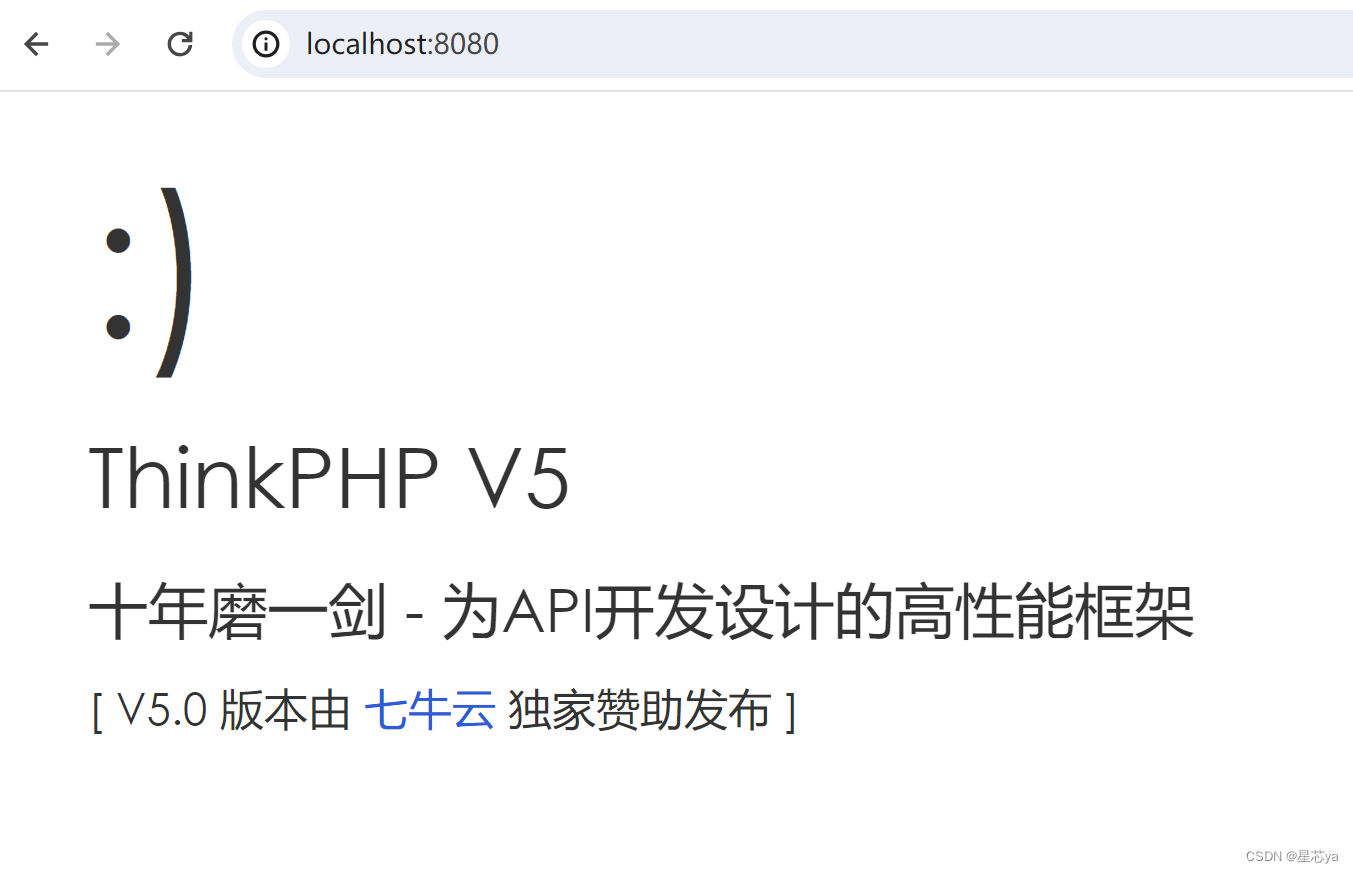
Firstly, if the welcome page for nginx appears at localhost: 8080, it means that you have successfully launched the nginx container. If there is no index.xml file in D:/docker/www. Please manually add and revisit to see the effect.
Next, place the thinkphp5 source code into the mounted directory D:/docker/www, as follows:
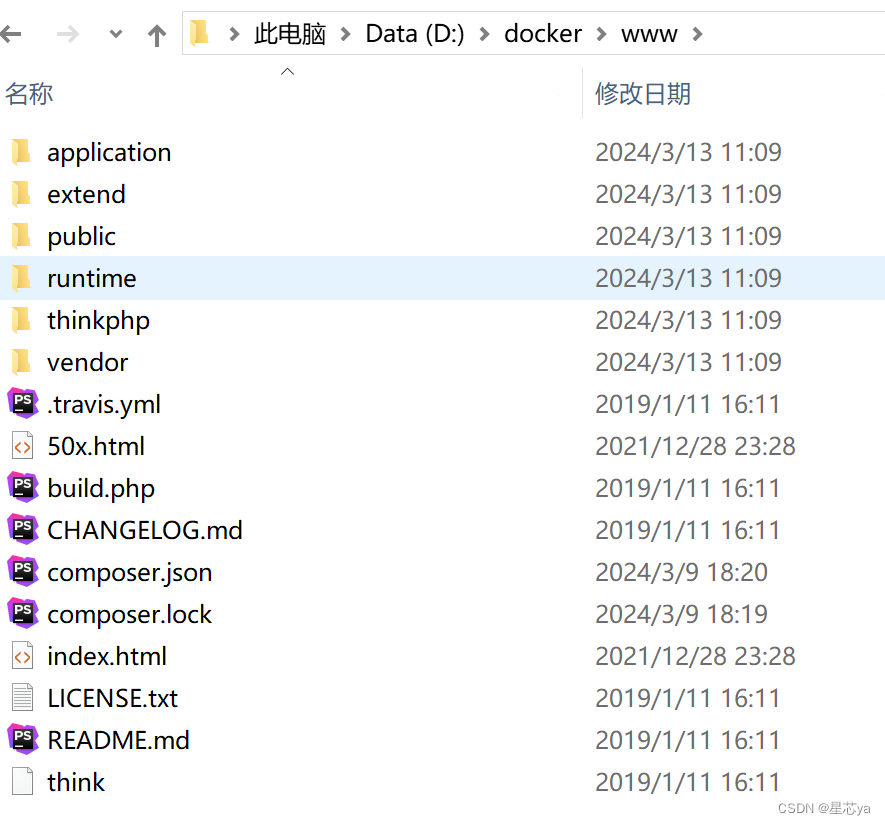
Open D:/Docker/nginx/conf/defaultconf and modify the content as follows:
server {
    listen       80;
    listen  [::]:80;
    server_name  localhost;
    root /www/public;   #Public in the directory corresponding to thinkphp5
    index index.php index.html;

    #access_log  /var/log/nginx/host.access.log  main;

    # location / {
    #     root   /usr/share/nginx/html;
    #     index  index.html index.htm;
    # }
    # Hide entrance file index.php
    location / {
        if (!-e $request_filename){
            rewrite  ^(.*)$  /index.php?s=$1  last;   break;
        }
    }

    #error_page  404              /404.html;

    # redirect server error pages to the static page /50x.html
    #
    error_page   500 502 503 504  /50x.html;
    location = /50x.html {
        root   /usr/share/nginx/html;
    }

    # proxy the PHP scripts to Apache listening on 127.0.0.1:80
    #
    #location ~ \.php$ {
    #    proxy_pass   http://127.0.0.1;
    #}

    # pass the PHP scripts to FastCGI server listening on 127.0.0.1:9000
    #
    location ~ \.php$ {
       fastcgi_pass   phpfpm:9000;   # The PHP container name and port to be started, using localhost: 9000 locally, do not need to be changed in this example
       fastcgi_index  index.php;
       fastcgi_param SCRIPT_FILENAME $document_root$fastcgi_script_name;
       fastcgi_param PATH_INFO $fastcgi_path_info;
       include        fastcgi_params;
    }

    # deny access to .htaccess files, if Apache's document root
    # concurs with nginx's one
    #
    #location ~ /\.ht {
    #    deny  all;
    #}
}
2
3
4
5
6
7
8
9
10
11
12
13
14
15
16
17
18
19
20
21
22
23
24
25
26
27
28
29
30
31
32
33
34
35
36
37
38
39
40
41
42
43
44
45
46
47
48
49
50
51
52
53
After modifying and saving the above files, restart the nginx container and visit localhost: 8080 to see the welcome page for thinkphp5!
# Step 6: Connect to MySQL database
Modify the host name in the thinkphp5 database configuration:
'hostname' => 'mysql-container:3306',//MySQL container name: internal port
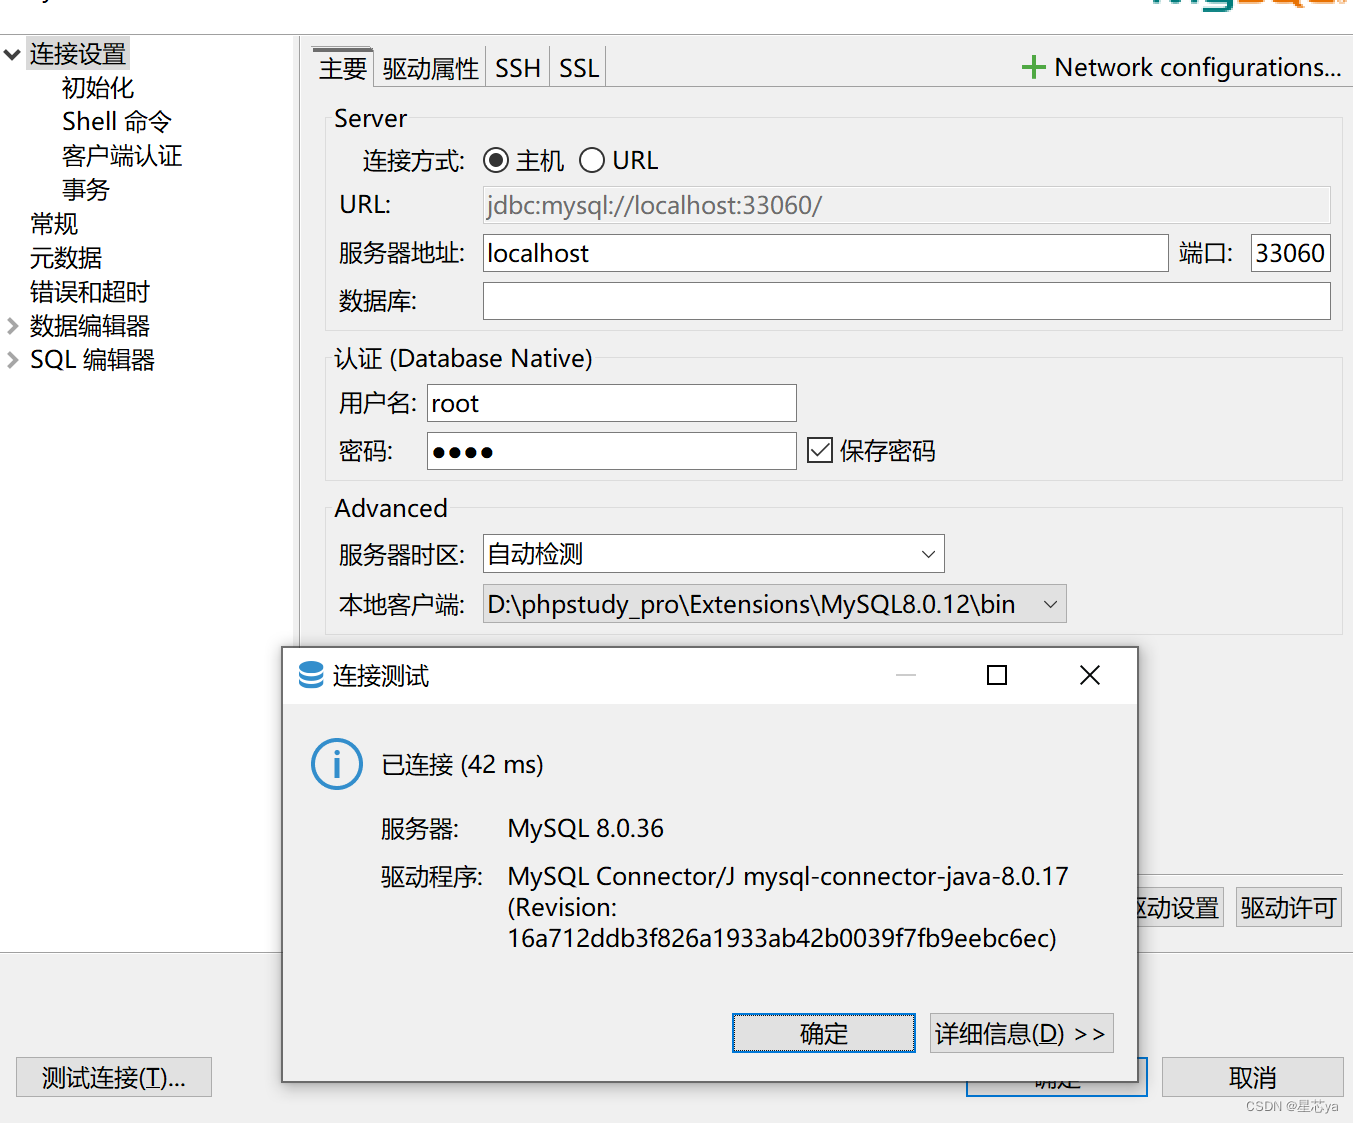
The tool connects to MySQL on port 33060, with the account root and password - e MYSQL ROOT PASSWORD. The successful connection is as follows:
Conclusion:
After everything is configured, you can happily use Thinkphp5 to write business.
The above is my personal learning experience. If you have any questions or feel that the configuration is incorrect, please contact me. Thank you for reading!!